E-Flite Mini Convergence
Decals - The Control system - Flying - Trim - Conclusion
Decals - The Control system - Flying - Trim - Conclusion
All that I've read about the original Convergence made it very interesting to me, particularly the problems. Unfortunately, my lack of mobility (I'm paraplegic) ruled it out because of it's size. The mini Convergence seemed ideal because I could fly it in my living room.
This is a Vertical Take Off and Land (VTOL) model. It takes off and lands as a tricopter with two forward and one rearward motor and translates into an aeroplane by rotating the two forward motors from vertical to horizontal and switching the rearward motor off. You then have a twin engined delta model with elevon control. The elevons are inactive during hovering flight. The translation is done automatically at the flick of a switch. You also have a choice of 'safe' or 'acro' mode (more anon).
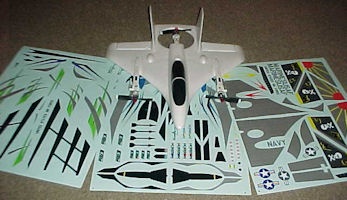
The box contains surprisingly little. You get the model, three sheets of decals, two spare props (one right, one left hand) a manual and a Quick Start Guide. As usual, the box is a useful means of storing and carrying the model. There is no provision for a transmitter.
Having read about prop nuts coming loose on the large one, the first thing I checked was the propnuts. They were no more than finger tight! I was surprised to find that there was no knurling on the motor, just a smooth surface. Likewise the prop and propnut were smooth. I seriously doubt whether threadlock will do the trick. I added a layer of UHU 'Por' (a plastic friendly glue) on the back of the prop and on the thread. So far, so good (10 flights).
The Mini Convergence is available as either 'BNF' or 'PNP'. The difference is that the 'BNF' is equipped with a Spektrum DSMX receiver while the 'PNP' doesn't have a receiver. The Spektrum receiver is connected to the flight controller by a series lead. If you use another receiver you will have to make up six leads to connect your receiver servo outputs to the flight controller. Be aware that there is a very limited amount of room to do this. The supplied Spektrum receiver is, in fact, a satelite receiver as connected to a main receiver.
I've read about difficulty with binding. Horizon insist that DSM2 and DSMX are crosscompatible, but the BNF version of the Convergence will only bind with DSMX. I don't have a compatible DSMX Spektrum transmitter but was able to bind both my Jumper 'T8SG' and 'T8SG V2' transmitters to the Mini Convergebce without problems. It seems that DSM2 and DSMX are not only no lomger compatable but there are now two versions of DSMX. Not surprising that there are so many alternatives to Spektrum.
I was unable to source the correct E-Flite battery (3 cell 800 mAh 30C) with a mini-JST connector. However, I found that the Turnigy 'Nano-tech' 3 cell 950mAh 30C battery was exactly the same size, had the correct connector, and fitted perfectly. I was rather doubtful about the mini-JST connector which really can't cope with more than 2 cells. Sure enough, after a few flights the plug and socket welded themselves together and I had to cut the battery leads to disconnect. Before this I experienced unexpected surges and reductions in power. I replaced all of the connectors with micro Deans plugs which have always given me good service.
The battery compartment also has a plug to supply an FPV camera/transmitter if you wish to go that route.
After 10 flights the mini-JST plug and socket welded together and I had to cut the battery leads to disconnect,
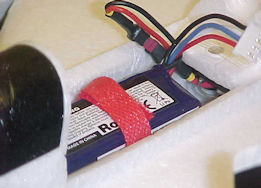
I replaced all of the battery plugs with micro Deans connectors.
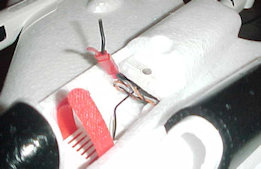
There is a hatch on the bottom of the model which gives access to the receiver and flight controller and I removed this to make it easier to change the plug. Inside I found a muddle of wiring with the receiver floating around free and both antennas mixed up with the wiring. Not the way we are taught to do things!
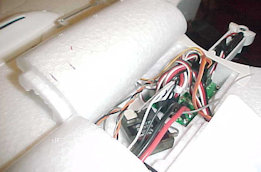
Where I come from we call this 'a Buggers Muddle'.
Another feature I didn't like was the method of hinging the front motors. They pivot from a vertical position (hovering flight) to a horizontal position (forward flight). The pivot consists of a screw through a plastic side piece which is very thin. The 'hinge', therefore, comsists of the screw thread against the plastic. This was very sloppy. On the early flights the model oscillated as if the gyro gain was set too high. It soon becane apparent that this was due to the motors wagging back and forth. After 10 flights this had increased (along with the slop). I downloaded the manual for the larger Convergence and found that this used an identical system. This cries out for ballraces. Fortunately, there are no reports of failure in this area. I re-examined the Youtube videos and could see no evidence of this motor movement on others. After further flights I came to the conclusion that this was, indeed, similar to the tailwag on a helicopter when the gyro was set too high. Unfortunately, there is no way of ajusting this and I am stuck with it (but see later).
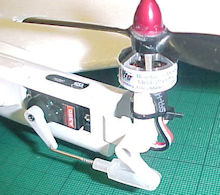
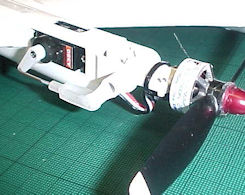
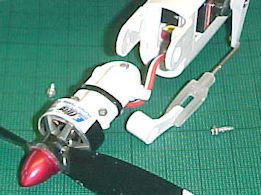
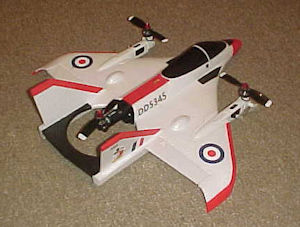
Forward motor in multirotor position/Airplane position/Pivot disassembly.
Motor osxillating back and forth in the hover
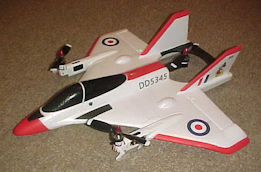
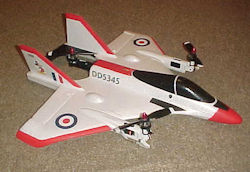
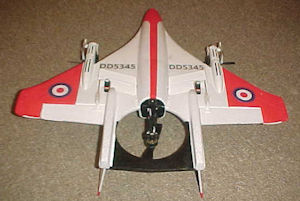
Non of these really appealed to me, so I decided to do my own colour scheme. I must admit I rather liked the pristine white and did all of my early flying that way in case I broke it!
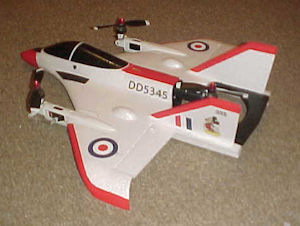
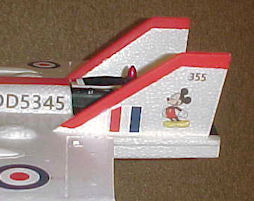
I decided to invent a fictitious RAF display team, which usually have their own scheme. This meant I could leave it mainly white. The squadron emblem on the fin reflects the nature of the model. The 'duct' at the rear of the model doesn't really fit so I painted it matt black so I could pretend it doesn't exist!
Lateral control (aileron) of the tricopter is obtained by differential thrust of the two front motors. Pitch control (elevator) is obtained in two ways. In 'safe' mode the two front motors move backwards and forwards together and move the machine backwards and forwards. 'Acro' mode uses differential thrust of the front and rear motors. 'Safe' mode limits the angle of bank that can be acheived in any direction. Yaw control (rudder) is obtained by tilting the front motors (one back, one forward).
In 'Airplane' mode, control of roll and pitch is obtained by elevons, while yaw is obtained by differential thrust of the two front motors.
There are two different set-ups detailed for the model. The manusl shows a method using two 2 position switches. One switches between 'Airplane' and 'Multirotor' modes, while the other selects 'Safe' or 'Acro' mode. There is also a Quick Start Guide set-up which uses a 3 position switch which ommits the Multirotor/Acro Modes.
Translation from 'Multirotor' to 'Airplane' involves the forward motors moving from vertical to horizontal (in 3 stages), the rear motor stopping and the elevons becoming effective. Conversely, translating the other way involves the front motors moving from horizontal to vertical, the rear motor becoming operational and the elevons becoming fixed. This is all done at the flick of a switch and the pilot has no control over the process (he can change the throttle).
The Jumper 'V2' transmitter has two 2 position switches mounted on the top of the transmitter. I used the left one to switch between 'Acro' (forward) and 'Safe' (back). The one on the right switches between 'Airplane' (forward) and 'Multirotor' (back). On the front left I have a 2 position switch with a long toggle which serves as 'Throttle Hold'/'Motor Arm' and a 3 position switch with a short toggle which selects 100%, 70% or 50% rate on aileron and elevator. I fly Mode 1 (right hand throttle).
I did try the original jumper transmitter with the three position switch set-up. I ommitted the 'Airplane'/'Safe' option. This worked fine but my reservation on this is finding the right switch position without looking at the transmitter. Getting it wrong could be expensive.
So far, I've only hovered the model indoors. It is quite difficult to take off in 'acro' mode due to ground effect but no problem in 'safe' mode. I did find a tendency to drift to the right. This can be countered initially by transmitter trim. However, the flight controller will remove this the next time you start. The solution is to use your arming switch/throttle hold to switch in the necessary offset.
The manual suggests that you should use your throttle trim to ensure that the motors don't stop in flight. The problem then being that the flight controller will mean this has to be reset every time you start. Once again you can use the 'throttle hold'/'arming switch' to do this automatically. I started up the model and used the throttle end point ajustment to set the motors at a low speed. I then noticed that the model was slowly turning left and I had to use right rudder to compensate. Then the penny dropped. The model was trying to turn left and the flight controller was trying to compensate. Hence the oscillation.
I balanced the model on a box so that it could turn freely and ajusted the motor/servo linkages so that it no longer tended to turn. You guessed - it still oscillated! After some further thought, I realised that we have two motors turning clockwise and one turning anticlickwise, so the system can never balance. There will always be a tendency to yaw to the left and the gyros attempt to cancel this (a heading hold type) will cause the oscillation. What baffles me is that nobody else has noticed it.
It's worth pointing out here that the elevator channel also has a heading hold gyro. In Multirotor/Safe mode, the elevator stck merely moves the model backwards and forwards. It has no effect on the models attitude. In Airplane/Safe mode, the elevons maintain the fore/aft attitude. The point here is that you MUST initiate the flight controller in a level attitude. If you initiate things in a nose down attitude, it will hover nose down and will dive when you switch to forward flight.
Life would be so much simpler if you could turn the flight controller off while you trim the model.
Longer flight shows the motors still oscillating.
Foe example, if you initialise the controller with the model in a nose down attitude, it will hover nose down. This is not a dangerous condition due to the fact that it is balanced by the three motors. However, when you switch to forward flight it will dive into the ground.
If you need to trim the model via the transmitter, you have a problem. The easy(?) answer is to note what trim is required, remove the trim while you initialise the flight controller and then reapply it. The solution depends on your transmitter. It may be possible to program things such that the trim is automatically applied when you arm the motors. In the hover mode this is really the only way since you cannot adjust the speed of the motors individually.
In forward flight the solution is to trim the model by mechanically adjusting the linkages to the elevons. Remember transmitter trim will only work for one flight.
It doesn't seem to be clear to people that it takes more power to hover than it does to fly in 'airplane' mode. So, if you've reduced power and switch to hover mode it will drop. Then the tail motor kicks in and pushes the nose down. Treat it like a heli. Come in nose high and power up and then switch to hover.
In lots of videos, people fly around in 'multirotor' mode, then switch to 'airplane' mode and burn around the sky for several minutes, using up their battery. They then make one or more attempts to switch to hover mode, at which point they are putting an increased load on an already exhausted battery. For your first flights, at least, it would be better to do one circuit in forward flight and immediately switch back to the hover and learn to transition. It's worth stressing that you have to learn to transition, it's not automatic. I suspect heli pilots (not multirotor pilots) will have an easier time here.
In the event that the motors do stop, there is little chance that this model will glide and the nose will drop, giving the impression that the model has dived into the ground. This is not helped by the fact that it appears to be nose heavy in 'airplane' mode (it even LOOKS noseheavy). When switching form hover to forward flight there is a noticeable nose down pitch.
One thing which is noticeable in all the videos is how twitchy it is on lateral control even in hovering safe mode. In this condition, the elevator stick only moves the model back and forth, it doesn't effect the attitude.
Doing hovering circuits in a wind is not advisable. When turning crosswind you should bank the model into wind. Despite what aerodynamicists will tell you. the model DOES know which way the wind is blowing. Always transition (either way) INTO wind.
If there is a problem with this model it would appear to be caused by the fact that the pilot has no control during transition. The change is made at the flick of a switch. It might be better if this was done gradually by the pilot.
So, whether you like it or not, most problems are caused by the pilots unfamiliarity with the process of transition.
![]()
![]()